How to Restore Your WDTV to Factory Firmware
B-Rad’s custom firmware not working out for you? Having a problem with crashing or locking up? You may want to restore your WDTV to the latest “Factory” firmware… i.e. the firmware that Western Digital has developed and tested as being stable. (Personally, I have no issue with B-Rad’s custom  firmware but I have had several people request that I put this together and understandably things don’t always work the same for everyone and furthermore people have different wants/requirements…)
Well, you are in luck! In this brief tutorial I have provided everything you need (software with the necessary file modifications and easy to follow instructions) to flash your WDTV back to the stock firmware provided by Western Digital. FIRST, as with all of my tutorials you need to download the appropriate software package for this little operation from one of the two links below:
If you have a 1st generation WDTV, download from here:
If you have a 2nd generation WDTV, download from here:
If you don’t know the difference then read this: How to Tell the Difference Between WDTV Devices and then download the appropriate package for your device….
Finally, you will also need a blank USB thumb drive… (if it isn’t blank, backup everything on it because we are going to be “reformatting” it which will erase all of the data).
OK… now that you have the appropriate package, the instructions going forward are fairly simple…
STEP 1. Extract the contents of my zip file to a new folder on your desktop.
STEP 2. Plug the thumb drive you will be using into your computer. I recommend you unplug all other USB hard drives / thumb drives / storage devices from your computer for the remainder of this tutorial.
STEP 3. Open the “STEP 3” Folder from my extracted software pack and double-click the “usb_format.exe” file. In the “USB Disk Storage Format” tool window that pops up:
a. Select your usb thumb drive from the “device” drop down box (if you unplugged all other drives from your PC, it should be the only option. IT IS CRITICAL YOU SELECT THE CORRECT DEVICE BECAUSE THIS PROGRAM IS GOING TO ERASE EVERYTHING ON THE SELECTED DRIVE.  Yes, I accidentally formated my 500 GB external hard drive with this program once and spent half a day recovering all my data! Humorous now but not at the time 🙂
b. Select “FAT 32” from the File System drop down menu.
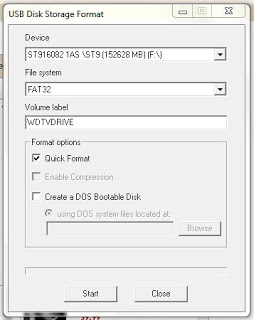
 c. Under “Volume Label” name your device WDTVDRIVE (you can also name it whatever you want, just don’t put any spaces)
 d. Put a check mark in the box next to “Quick Format”
e. Leave the boxes next to “Enable Compression” and “Create a Dos Bootable Disk” empty
f. Double-check everything and then hit the “Start” button. The formatting process shouldn’t take very long at all… You can click “close” when it is finished.
.;
STEP 4. OK, now we have a blank, properly formatted thumb drive. Keep it plugged in. Copy the contents (two files for Gen 1 units;Â three files for Gen 2 units) from the “STEP 4” folder directly onto your Thumb Drive. They should be the only thing on the drive.
STEP 5. Eject and Unplug your thumbdrive from your computer. Power down your WDTV using the remote control’s power button. THEN, unplug the power cord from your WDTV. Unplug ALL other USB drives from your WDTV.
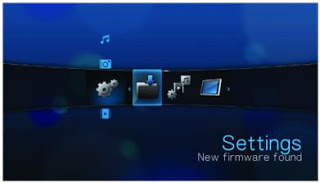
STEP 6. Plug the thumb drive into the “side” USB port of the WDTV. Plug the power cord back into the WDTV and wait for the unit to power back on and fully load into the interface.
a. Once everything has loaded, your WDTV may jump immediately to the proper icon saying that there is “new” firmware found.
b. If not, navigate to the “Settings” bar and select the firmware upgrade icon and press the “ENTER” button on your remote.
STEP 7. You will be prompted to install the firmware. Select “OK” and hit the “ENTER” button on your remote.
STEP 8. WAIT AND DON’T TOUCH ANYTHING. The system will first reset itself and it will then bring up a progress bar and start to change the firmware. It could take a few minutes, sometimes it can take quite a bit longer. I honestly don’t know why it varies as much as it does at times. Regardless, don’t freak out and do anything silly. Wait for it to finish doing its thing. It will eventually give you an “upgrade finished” message and tell you it needs to reboot. Hit the “ENTER” button on your remote when this happens, the system will reset.
STEP 9. When the system reboots and loads up again, it will tell you there is new firmware to install. This is not an “error.” Your firmware is upgraded, you don’t need to go through the process again. But we do want to get rid of this annoying message. SO… turn off your WDTV and unplug it. Unplug your thumb drive.
STEP 10. Plug your thumb drive back into your computer and open it up.
STEP 11. Copy the contents of the “STEP 11” folder directly onto the thumb drive. The system will ask you if you want to overwrite a file on the drive… select “YES” or “Overwrite” or “Replace”. The idea is that you want to replace the file on the drive with the file from the STEP 11 folder that has the same name.
–YOUR DONE!–
You can now use this thumb drive for whatever you want, you can plug it back into the WDTV and it should no longer tell you to update your firmware. The firmware that is now installed is the factory stuff. Cheers!